 Hadoop is an open source distributed storage and processing software framework sponsored by Apache Software Foundation. It’s core technology is based on Java as Java natively provides platform independence and wide acceptance across the world. In recent years, Hadoop has grown to the top of the world with its innovative yet simple platform. Here are 6 top reasons why Hadoop is the Best Choice for Building Big Data Applications. If you are interested in setting up Hadoop on your personal MacBook or Linux OS computer, then you can check our post with step by step guide: How to setup Apache Hadoop Cluster on a Mac or Linux Computer Before we look into How to Quickly Setup Apache Hadoop on Windows PC, there is something that you need to understand about various installation modes that Hadoop offers.
Hadoop is designed to work on a cluster of computers (called machines or nodes) but its engineers have done excellent job in making it run on a single machine in much the same way as it would do on a cluster of machines.
In a nutshell, there are three installation modes supported by Hadoop as of today and they are:
Local (Standalone) mode
The Local or standalone mode is useful for debugging purposes. Basically in this mode; Hadoop is configured to run in a non-distributed manner as a Single Java process that will be running on a computer.
In other words, it will be like any application such as Microsoft Office, internet browser, etc that you run on your computer. This is the bare minimum setup that Hadoop offers and is mainly used for learning and debugging purposes before real applications are moved to large network of machines.
Pseudo Distributed mode
Pseudo distributed is the next mode of installation provided by Hadoop. It is similar to Local/Standalone installation mode in the sense that Hadoop will still be running on the single machine but there will be Multiple Java processes or JVMs (java virtual machines) that will be invoked when hadoop processes starts.
In Local mode, everything is running under single Java process but in Pseudo Distributed mode, multiple Java processes will be running one each for NameNode, Resource Manager, Data nodes etc. This installation mode is most near production like experience that you can get while still running hadoop on a single machine.I will show step by step how we can quickly setup apache Hadoop on windows PC by end of this article.
If you want to be an expert in Hadoop, then you must check these books, book, book.
Fully Distributed mode
This is the mode used for production like environments consisting of tens of thousands of machines connected together to form a large network of machines or a cluster. This mode maximizes the use of Hadoop’s underlying features such as distributed data storage and distributed processing. If your organization is into big data technologies, then most likely their setup will be in fully distributed mode.
Now we have learned about various installation modes, we can start with setting up Hadoop on a Windows PC in Pseudo-distributed mode next.
We will cover the steps needed to install Hadoop on a personal computer (laptop or desktop) with Windows 10 Home (64-bit) OS.
Quick side note, here is a list of related posts that I recommend:
- 6 Reasons Why Hadoop is THE Best Choice for Big Data Applications – This article explains why Hadoop is the leader in the market and will be one for long long time.
- What is MobaXterm and How to install it on your computer for FREE – If you haven’t used MobaXterm before, then I highly recommend you to try it today. I guarantee you will never look back.
- Learn ElasticSearch and Build Data Pipelines – This is actually an intro to a very comprehensive course on integrating Hadoop with ElasticSearch. This is one of key skills for advancing your data engineering career.
- How to setup Apache Hadoop Cluster on a Mac or Linux Computer – step by step instructions on how to get started with apache Hadoop on a Macbook or Linux machine.
Alright, let’s roll up the sleeves and get started.
Hortonworks Data Platform Sandbox
The easiest way to get started with Hadoop on a Windows machine is by using Hortonworks Data Platform (HDP) sandbox image.
A sandbox image can be a plain operating system or can have other softwares installed within it.
HDP sandbox comes with a CentOs operating system and all necessary softwares tools and configurations required to run hadoop cluster; packaged within a single file called sandbox image.
We can run this file using a VirtualBox application (covered next) and run whole setup as a computer inside a computer.
If it’s getting confusing, don’t worry about it as it will be clearer by the time we finish our installation.
HDP Sandbox is distributed by Hortonworks for FREE. So go ahead and download it now.
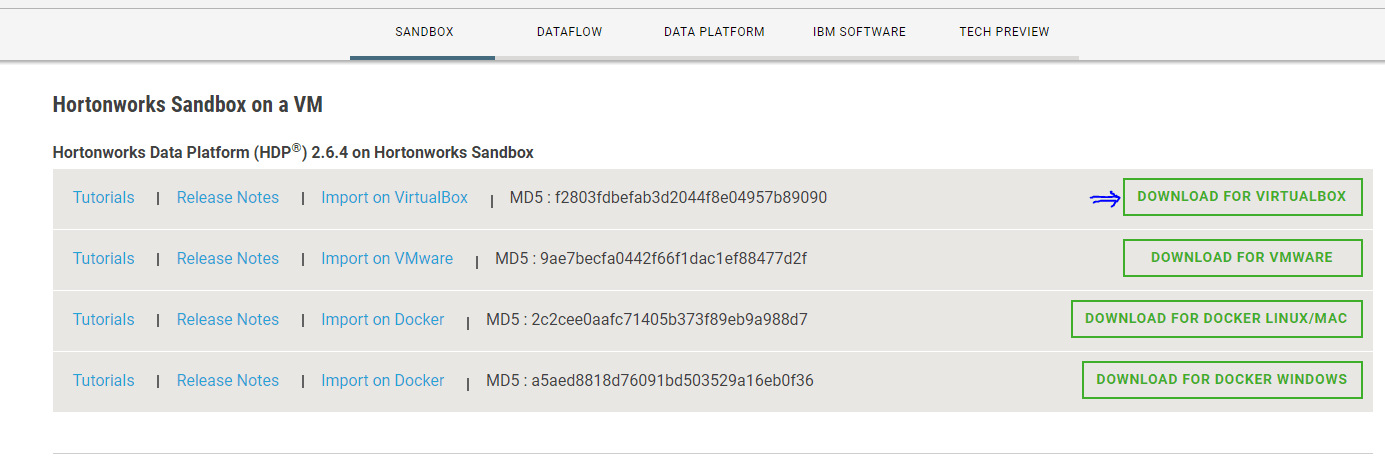
Click on the first button – Download For VirtualBox.
This will download a sandbox image which is packed with many Big Data technologies such as HDFS, Hive, Spark, Flume etc all with it. You can read more about a critical bug we found in Apache Hive and how to troubleshoot it. So it may take a while before its fully downloaded.So RELAX !!!

While HDP Sandbox image is downloading, we can setup the VirtualBox in meantime.
VirtualBox
VirtualBox is the tool that will load HDP sandbox image into memory and run it as a computer with in a computer. Remember, I mentioned before that we will run a computer within a computer. That’s what VirtualBox does.
In this particular case, VirtualBox will let us run a Linux operating system (HDP Sandbox Image) within a Windows PC.
It is also free to use and is available from Oracle. So, lets download now.
You will need to register at Oracle’s website before it allows you to download VirtualBox. It is free registration and you can easily do it with a valid email address.

Open the VirtualBox setup and you will get this screen
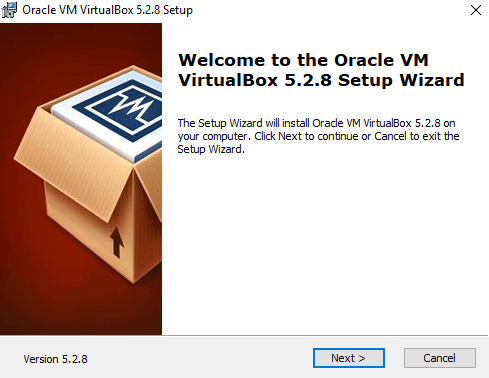
Click Next button to proceed.

You can leave default settings here unless you prefer to install applications in different folder. You can click Next button.

Now click Next button
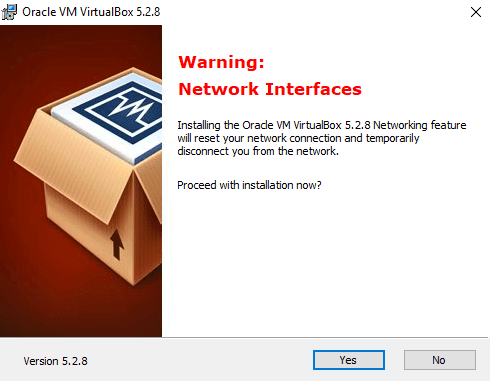
Click Yes to start the installation.
After installation is complete and HDP sandbox image is also fully downloaded, proceed to next section below.
Load Sandbox Image
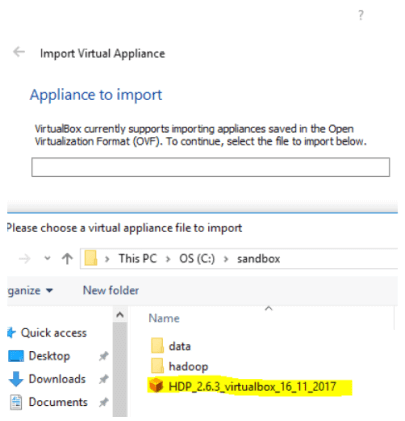
Open VirtualBox application. Click on File menu at the top and choose ‘Import Appliance’
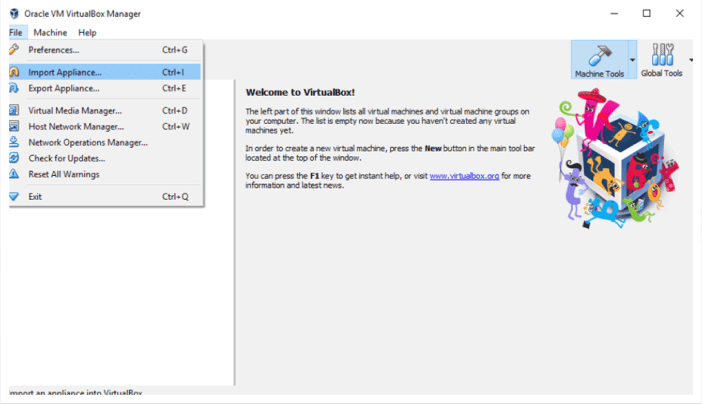
Select the HDP sandbox image file from downloaded location and then click next
For now, leave the default settings and click on import button
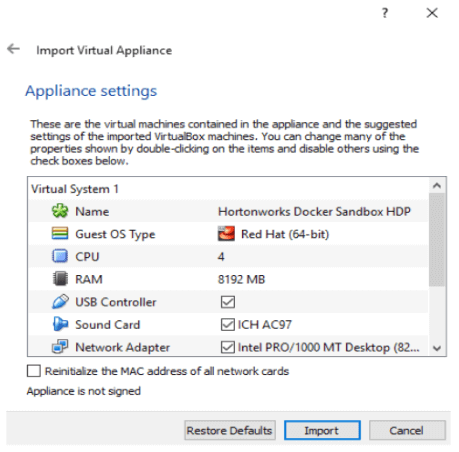
If there are no issues in previous steps, it should start importing the sandbox image. This will take a while as image file is few GBs in size and it will be loaded into the memory.

After import is successfully done, your screen should look similar to this. Notice the left panel of the window has a new item in it. This is your sandbox image.
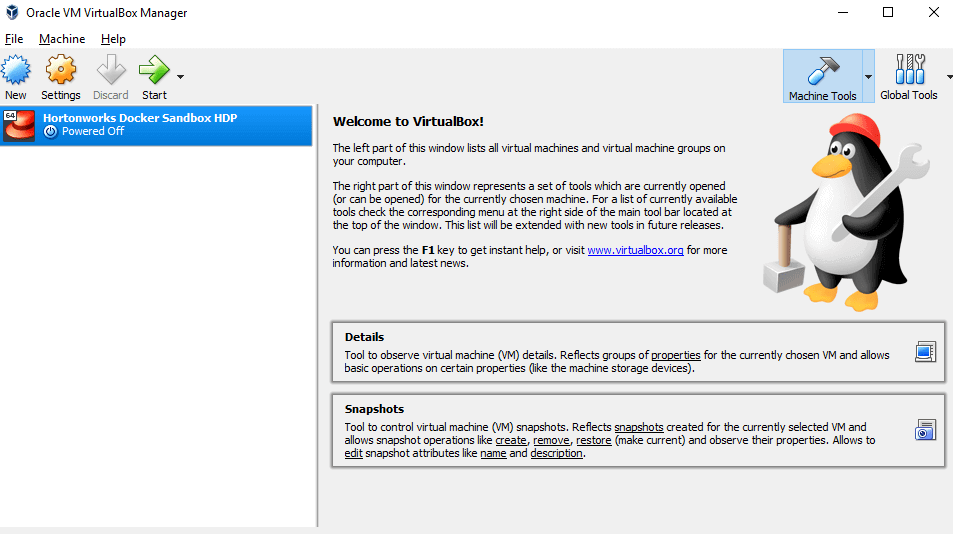
Now while HDP Sandbox image is selected on left panel, click on Start icon at the top to start the virtual machine. Choose Normal Start from drop down.

When the start process is running, a new terminal window will pop up indicating virtual machine is being booted up. Let’s give it few minutes.

It may take few minutes for virtual machine to be fully started. Once it’s ready you should see a screen like below
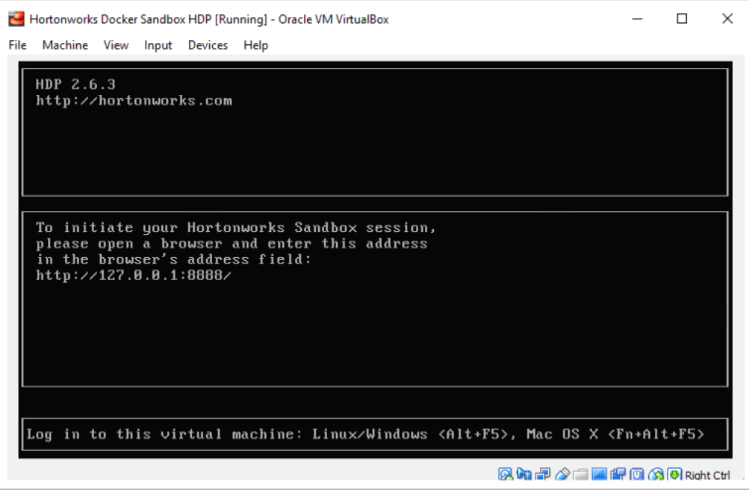
Next copy http://127.0.0.1:8888 address from above image and paste it in a browser. This will open following screen in the browser.

Now click on Launch Dashboard button.
It will present Ambari Login screen as shown below. On this screen, enter following credentials to proceed:
Username: raj_ops
Password: raj_ops

After successful login, you will get a screen like this

This screen is Ambari’s dashboard which provides the overall view of cluster health.
Now you will notice various big data technologies are listed on the left side panel. Each one of them has its own dedicated page if you click on it.
On a quick side note, do you know which cloud computing skill is the hottest today? This one skill can boost your pay scale in no time. We highly recommend you to add this skill to your resume before it’s late.
We recommend you to play around with each item and see how individual dashboards look like.
The items with green tick indicate that the particular service is running fine. If any service is without a green tick then it is either shut down or having some issues.
If you reached this stage, you have a running Apache Hadoop on Windows PC.I am sure you will think how easy it was to set up Apache Hadoop on Windows PC.
Congratulations !!! (drums rolling)
BONUS
Now we can connect to Hadoop Host.
Connecting to Hadoop Host
Before proceeding with this section, ensure that Ambari dashboard is UP and Running.
Open MobaXterm or any of your favorite terminal on computer and select SSH option. If want to learn about how to set a terminal then checkout our post on the ultimate guide on the best command line terminal tool called MobaXterm.
Now enter host as 127.0.0.1 and port 2222 in the terminal. Type in following user credentials when it asks for it.
User: root
Password: hadoop
Earlier we had used different credentials to log into Ambari’s dashboard so, just keep a note of it.
On first login, it will prompt you to change the password. You can set it to anything that you like and make sure that you keep a note of it somewhere safe otherwise you will have to repeat whole installation process again in case this password is lost or forgotten. I already warned you!!!
Once you have changed the root password, you will gain access to the virtual machine through terminal and the screen prompt will change to something as shown below.

Now you can connect to Hadoop Sandbox machine and run Hadoop Shell commands or run your big data applications on your own Hadoop.
Now you have set up Hadoop on your machine, you can take it further by installing Spark, Scala and SBT too or try your hands on integrating Hadoop with ElasticSearch.
We hope you enjoyed reading this article on How to quickly setup Apache Hadoop on Windows PC. Let us know your thoughts on what you think about this post in comments.


[…] How to Quickly Setup Apache Hadoop on Windows PC – Step by step instructions on how to setup Apache Hadoop on windows PC within an hour. […]
[…] How to Quickly Setup Apache Hadoop on Windows PC – Step by step instructions on getting onboard with Apache Hadoop in an hour. […]
[…] How to Quickly Setup Apache Hadoop on Windows PC – Learn how to setup Apache Hadoop on your home computer and use it as a corporate data center. […]
[…] How to Quickly Setup Apache Hadoop on Windows PC – step by step instructions on how to get started with Hadoop on windows PC. […]
[…] How to Quickly Setup Apache Hadoop on Windows PC – step by step instructions on how to getting started with Hadoop […]
[…] How to Quickly Setup Apache Hadoop on Windows PC – step by step instructions on how to getting started with Hadoop […]
[…] you have checked our post on How to Quickly Setup Apache Hadoop on Windows PC, then you will find in this post that its comparatively easier to install Apache Hadoop cluster on […]
[…] you haven’t setup apache Hadoop on your computer yet, then you should checkout our related posts How to Quickly Setup Apache Hadoop on Windows PC for windows users & How to setup Apache Hadoop Cluster on a Mac or Linux Computer for our […]
[…] How to Quickly Setup Apache Hadoop on Windows PC – Step by step instructions on how to setup Hadoop on personal computer. […]
[…] In case you are a windows PC user, then refer this guide to install Apache Hadoop on your windows PC. […]