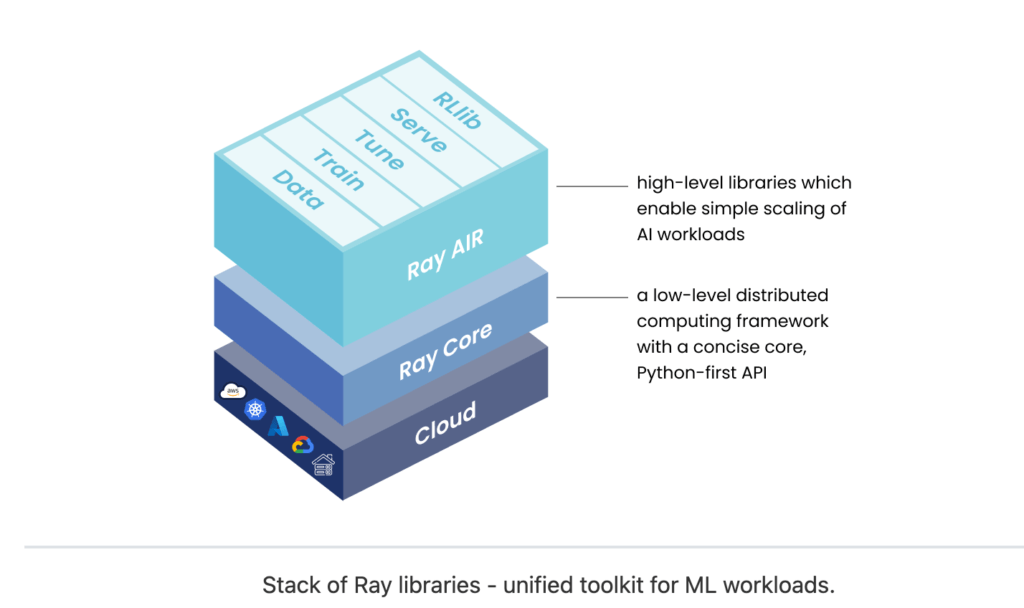
Image processing tasks, such as resizing, filtering, and enhancing, can often be time-consuming, especially when dealing with a large collection of images. Ray Python, an open-source unified compute framework, provides a simple and efficient way to scale and parallelize Python workloads, making it ideal for accelerating image processing tasks. In this blog post, we will explore how to use Ray Python for parallel image processing, step-by-step, with code examples.
Prerequisites: Before we dive into the code examples, make sure you have the following prerequisites:
- Python installed on your machine
- Pip installed for package management

Step 1: Install Ray
The first step is to install Ray Python using pip, the Python package manager. Open a terminal or command prompt and run the following command:
!pip install rayThis will install the Ray package on your system.
Step 2: Import Libraries
Next, we need to import Ray and any other necessary libraries for image processing. Here’s an example of how to import the necessary libraries in Python:
import cv2
import ray
In this example, we are using the OpenCV library for image manipulation and the Ray library for parallel processing.
Step 3: Initialize Ray
Before we can use Ray, we need to initialize it by calling the ray.init() function. This initializes the Ray runtime and sets up the necessary resources for parallel processing. Here’s an example of how to initialize Ray:
ray.init()This will initialize Ray with its default configuration.
Step 4: Define the Image Processing Function
Now, we need to define a function that represents the image processing task we want to perform on each image. This function should take an image as input and return the processed image. Here’s an example of how to define an image processing function:
def process_image(image):
    # Perform image processing tasks (e.g., resizing, filtering, enhancing)
    # and return the processed image
    processed_image = ...  # Image processing code here
    return processed_image
In this example, the process_image function takes an image as input and performs image processing tasks on it, such as resizing, filtering, or enhancing. The processed image is then returned.
Step 5: Parallelize Image Processing with Ray
With Ray initialized and the image processing function defined, we can now parallelize the image processing task using Ray. We can use the ray.remote decorator to mark the image processing function as a remote function that can be executed in parallel on Ray workers. Here’s an example of how to parallelize the image processing task with Ray:
@ray.remote
def process_image_remote(image):
    # Call the image processing function on the remote worker
    processed_image = process_image(image)
    return processed_image

# Create a list of images to process
image_list = [...]  # List of images to process

# Process images in parallel using Ray
processed_images = ray.get([process_image_remote.remote(image) for image in image_list])
In this example, we have decorated the process_image function with ray.remote, which allows it to be executed remotely on Ray workers. We then create a list of images to process and use a list comprehension to call the process_image_remote function on each image in parallel using Ray’s remote() method. The ray.get() function is used to retrieve the processed images from the remote workers.
Step 6: Get Processed Images and Perform Post-Processing
Once the image processing tasks are completed on the remote workers, we can use the ray.get() function to retrieve the processed images as a list of results. We can then perform any post-processing tasks on the processed images, such as saving them to disk, displaying them, or further analysis. Here’s an example of how to retrieve the processed images and perform post-processing:
# Retrieve the processed images from the remote workers
processed_images = ray.get(processed_images)

# Perform post-processing tasks on the processed images
for i, processed_image in enumerate(processed_images):
    # Save processed image to disk
    cv2.imwrite(f"processed_image_{i}.jpg", processed_image)

    # Display processed image
    cv2.imshow(f"Processed Image {i}", processed_image)
    cv2.waitKey(0)
    cv2.destroyAllWindows()
In this example, we use a loop to iterate through the list of processed images retrieved from the remote workers. For each processed image, we can perform post-processing tasks, such as saving the image to disk using the cv2.imwrite() function from the OpenCV library, and displaying the image using the cv2.imshow() function. The cv2.waitKey() and cv2.destroyAllWindows() functions are used to display the processed image in a window and close the window after a key press.
Related Post: Scaling AI and Python Workloads Made Easy with Ray Python: An Open-Source Unified Compute Framework
Learn More about Ray Python
There are several good learning resources available to learn about Ray Python, the open-source unified compute framework. Some of the popular ones include:
- Official Ray Python Documentation: The official documentation for Ray Python is a comprehensive resource that provides detailed information on various aspects of Ray, including installation, concepts, API references, tutorials, and examples. It’s a great starting point for beginners to get familiar with Ray Python.
- Ray GitHub Repository: The Ray GitHub repository (https://github.com/ray-project/ray) contains the source code for Ray Python, along with extensive documentation, issues, and discussions. It’s a valuable resource for understanding the internals of Ray and exploring the latest features and updates.
- Ray Python Website: The official Ray Python website (https://ray.io/) provides an overview of Ray, its features, use cases, and resources for learning, including tutorials, documentation, and community forums.
- Ray Python Tutorials: Ray Python offers a range of tutorials that cover different aspects of the framework, from basic to advanced topics. These tutorials provide step-by-step instructions, code examples, and hands-on exercises to help users understand and implement various features of Ray Python.
- Ray Python Community: The Ray Python community is an active and supportive community of developers, users, and contributors. The community provides resources such as forums, mailing lists, and chat channels where users can seek help, ask questions, and learn from each other’s experiences.
- Ray Python YouTube Channel: Ray Python has an official YouTube channel (https://www.youtube.com/c/RayProject) that features video tutorials, demos, and talks related to Ray Python. These videos provide visual demonstrations and explanations of Ray’s features, use cases, and best practices.
- Online Courses and Blogs: There are several online courses and blogs available that cover Ray Python in depth. These resources provide comprehensive tutorials, case studies, and practical examples to help users understand and implement Ray Python in real-world scenarios.
- Books and Documentation: There are books and other written resources available that focus on Ray Python, providing in-depth coverage of the framework, its features, and best practices. These resources can be useful for users who prefer a more structured and in-depth approach to learning.
Ray Python provides a powerful and efficient way to parallelize image processing tasks, allowing for faster processing of large collections of images. In this blog post, we covered the step-by-step process of using Ray for parallel image processing, including how to install Ray, import necessary libraries, initialize Ray, define the image processing function, parallelize image processing tasks with Ray, and perform post-processing tasks on the processed images. With Ray, you can significantly speed up your image processing workflows and improve productivity. Give it a try and experience the benefits of parallel processing with Ray in your image processing projects!

